
How to Play
|
Although the normal size of a Go board is 19 by 19 lines, it is possible to use smaller sizes. A quick game can be played on a 13 by 13 board without losing the essential character of the game. The following examples all use a 9 by 9 board. We recommend that beginners learn the basics on a 9 by 9 board, moving up to a 13 by 13 board after a few games and only playing on a 19 by 19 board if you can play a complete game within 15 minutes and are comfortable with some of the strategic concepts. |


These images show boards at different sizes - the dots are the handicap points (see below)
The rules
A game of Go starts with an empty board. Each player has an effectively unlimited supply of pieces (called stones), one taking the black stones, the other taking white. The main object of the game is to use your stones to form territories by surrounding vacant areas of the board. It is also possible to capture your opponent's stones by completely surrounding them.
Players take turns, placing one of their stones on a vacant point at each turn, with Black playing first. Note that stones are placed on the intersections of the lines rather than in the squares and once played stones are not moved. However they may be captured, in which case they are removed from the board, and kept by the capturing player as prisoners.
| Diagram 1 |
|---|
|
At the end of the game, the players count one point for each vacant point inside their own territory, and one point for every stone they have captured. The player with the larger total of territory plus prisoners is the winner.
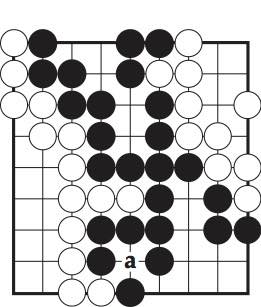
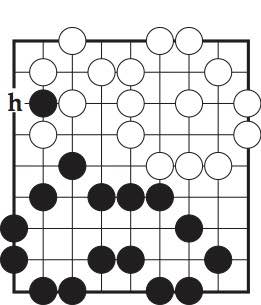
Diagram 1 shows the position at the end of a game on a 9 by 9 board, during which Black captured one white stone at a.
Black has surrounded 15 points of territory, 10 in the lower right corner and 5 towards the top of the board. Black's territory includes the point a formerly occupied by the white stone Black has captured. Adding this prisoner, Black has a total of 16 points.
White's territory is 17 points, so White wins the game by one point.
Capturing stones and counting liberties
| |||
| Diagram 2 | Diagram 3 | Diagram 4 | |
|---|---|---|---|

|
|
|
|
Diagram 2 shows three isolated white stones with their liberties marked by crosses. Stones which are on the edge of the board have fewer liberties than those in the centre of the board. A single stone on the side has three liberties, and a stone in the corner has only two liberties.
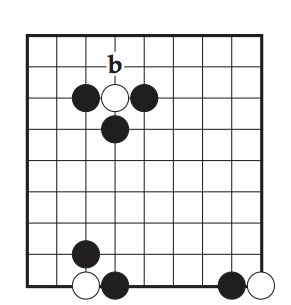
Diagram 3 shows the same three stones of Diagram 2 each with only one liberty left and therefore subject to capture on Black's next turn. Each of these white stones is said to be in atari, meaning they are about to be captured.
Diagram 4 shows the position which would arise if Black went on to play at b in Diagram 3. Black has taken the captured stone from the board, and in a real game would keep it as a prisoner. The same remarks would apply to the other two white stones, should Black play at c or d in Diagram 4.
| Diagram 5 |
|---|

|
Strings
Stones occupying adjacent points constitute a solidly connected string. Two examples of such solidly connected strings of stones are shown in Diagram 5. It is important to remember that only stones which are horizontally or vertically adjacent are solidly connected; diagonals do not count as connections. Thus, for example, the two marked black stones in the top left of Diagram 5 are two separate strings, not a single one.
Several strings close together, which belong to the same player, are often described as a group. So these two strings form a group.
| Diagram 6 | Diagram 7 |
|---|---|
|
|
Capturing strings
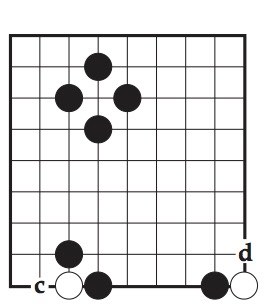
As far as capturing is concerned, a string of stones is treated as a single unit. As with isolated stones, a string is captured when all of its liberties are occupied by enemy stones.
In Diagram 6 the strings of Diagram 5 have both been reduced to just one liberty. Note that the black string in the top right is not yet captured because of the internal liberty at f. The two stones at the top left of Diagram 6 can each be captured independently at g or h.
In Diagram 7 we see the position which would result if Black captured at e and White captured at f and at g. The remaining black stone could be captured at h. As with the capture of a single stone, the points formerly occupied by the black string have become white territory, and vice versa.
| A player may not self-capture, that is play a stone into a position where it would have no liberties or form part of a string which would thereby have no liberties, unless, as a result, one or more of the stones surrounding it is captured. |
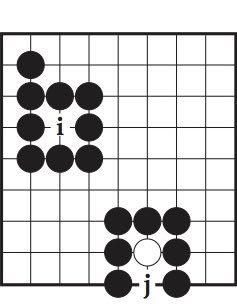
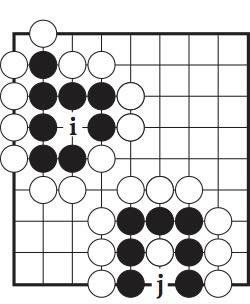
Diagrams 8 and 9 illustrate the rule governing self-capture. In Diagram 8, White may not play at i or j, since either of these plays would be self-capture; the stones would then have no liberties. However, if the outside liberties have been filled, as shown in Diagram 9, then the plays at i and j become legal; they fill the last black liberty in each case, and result in the black stones being captured and removed from the board as White's prisoners.
| Diagram 8 | Diagram 9 |
|---|---|
| 
|
| Diagram 10 |
|---|
|
Life and death and the concept of eyes
In Diagram 9, White was able to play at i and j because these plays result in the capture of the adjacent black stones. Since White's plays capture some stones, they do not count as self-capture.
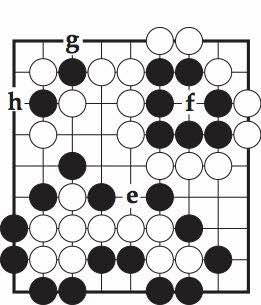
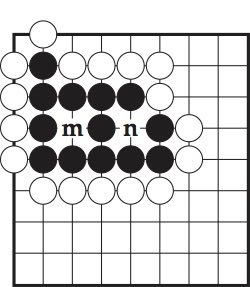
A different situation is shown in Diagram 10. The black string here could only be captured if White were able to play at both m and n. Since the first of these plays would be self-capture, there is no way that White can carry out the capture. These two separate spaces within the group are known as eyes.
| Any string or group of stones which has two or more eyes is permanently safe from capture and is referred to as a live string or live group. Conversely, a string of stones which is unable to make two eyes, and is cut off and surrounded by live enemy strings, is called a dead string since it is hopeless and unable to avoid eventual capture. |
| Diagram 11 |
|---|
|
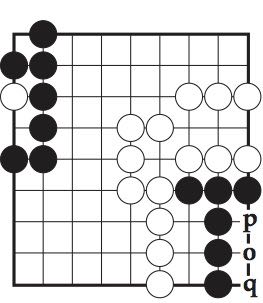
In Diagram 11, the black string at the bottom is in danger of being captured. To ensure that Black's string has two eyes, Black needs to play at o. If White plays at o, the black string will no longer be able to make two eyes, and cannot avoid eventual capture; White can always fill in the outside liberties and then play at p and at q. Black plays at p or q would only hasten the string's death.
The black string at the top left of Diagram 11 is already alive even though there is a White stone inside one of its eyes. Since White can never capture the black stones, the White stone caught inside the string cannot be saved.
In the course of a real game, players are not obliged to complete the capture of an isolated dead string once it is clear to both players that the string is dead. We call this a hopeless string. In Diagram 11, once White has played at o, the situation may be left as it is until the end of the game. Then, the hopeless strings are simply removed from the board and counted together with the capturing player's other prisoners.
| Diagram 12 |
|---|
|
The ko rule
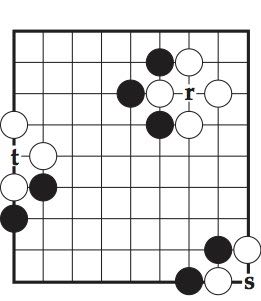
At the top of Diagram 12, Black can capture a stone by playing at r. This results in the situation at the top of Diagram 13. However, this stone is itself vulnerable to capture by a White play at u in Diagram 13. If White were allowed to recapture immediately at u, the position would revert to that in Diagram 12, and there would be nothing to prevent this capture and recapture continuing indefinitely. This pattern of stones is called ko - a Japanese term meaning eternity. Two other possible shapes for a ko, on the edge of the board and in the corner, are also shown in this diagram.
| Diagram 13 |
|---|
|
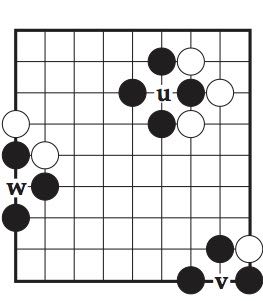
The ko rule removes this possibility of indefinite repetition by forbidding the recapture of the ko, in this case a play at u in Diagram 13, until White has made at least one play elsewhere. Black may then fill the ko, but if Black chooses not to do so, instead answering White's intervening turn elsewhere, White is then permitted to retake the ko. Similar remarks apply to the other two positions in these diagrams; the corresponding plays at w and v in Diagram 13 must also be delayed by one turn.
| Diagram 14 |
|---|
|
Seki - a kind of local stalemate
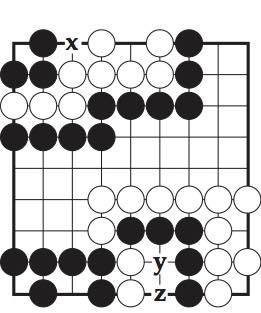
Usually a string which cannot make two eyes will die unless one of the surrounding enemy strings also lacks two eyes. This often leads to a race to capture, but can also result in a stand-off situation, known as seki, in which neither string has two eyes, but neither can capture the other due to a shortage of liberties. Two examples of seki are shown in Diagram 14. Neither player can afford to play at x, y or z, since to do so would enable the other to make a capture.
The end of the game
When you think your territories are all safe, you can't gain any more territory, reduce your opponent's territory or capture more strings, instead of playing a stone on the board you pass and hand a stone to your opponent as a prisoner. Two consecutive passes ends the game.
Any hopeless strings are removed and become prisoners. If you cannot agree whether a string is dead or not, then continue playing; you can then complete capture of disputed strings or confirm they are alive. (Playing during a continuation does not change the score as each play is the same as a pass.) Since Black played first, White must play last and may need to make a further pass.
Now you know how to play. However there are a few other things you should know:
The handicap system
As remarked in the introduction, one of the best features of the game of Go is its handicap system. A weaker player may be given an advantage of anything up to nine stones. These are placed on the board in lieu of Black's first turn. Once all the handicap stones have been placed in position it is White's turn to play.
Through the grading system, any two players can easily establish the difference in their strength, and therefore how many stones the weaker player should take in order to compensate for this difference. Since a player's grade is measured in terms of stones, the number of stones for the handicap is simply the difference in grade between the two players.
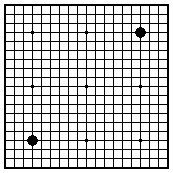
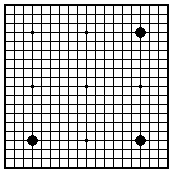
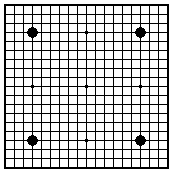
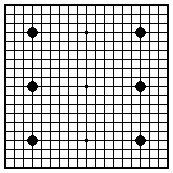
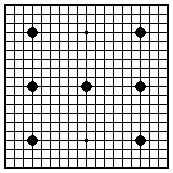
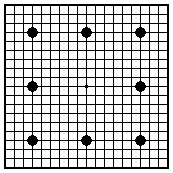
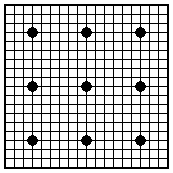
There is an established pattern for the placement of handicap stones, shown by the dots which are marked on any Go board. This is shown in Diagram 15 (Black is facing the board from the bottom), for each of 1 to 9 stones handicap.
| Diagram 15 | ||
|---|---|---|
|
 |
 |
 |
 |
 |
 |
 |
 |
Komi
Black has a natural advantage in playing first. So in games between players of the same strength, it is usual to compensate White for the disadvantage of playing second by adding points to White's score. These points are called komi. From experience the value of playing first is about 7 points, so this is the normal size of komi. In tournaments, komi is often set at 7.5 points to avoid draws.
In a 1 stone handicap the weaker player is Black but no komi is given to White.
Next: An Example Game

This page is part of the online version of our Play Go Leaflet.
If you have any comments, please email the webmaster on web-master AT britgo DOT org.